Artemis II - Mission profile
Header pic credits to John Kraus
The Artemis II mission will lift off as soon as a few days from now, with a launch window opening on February 8th.
In less than a week, the Artemis II crew (composed of commander Reid Wiseman, pilot Victor Glover, and mission specialists Christina Koch and Jeremy Hansen) will do something no human has ever done in more than 50 years: venturing to deep space, making a flyby of the Moon and then coming back to Earth. On their historic 10-day journey, they’ll gather scientific data with advanced instruments, release cubesats, take images of features no human eye has seen before, and be an inspiration for everyone who will learn about their journey. And what better place to start learning than here.
In this article, we will explore the precise steps of the mission, starting with the pre-launch countdown clock and then diving deep into the mission profile, from Earth orbit to splashdown in the Pacific Ocean, and everything in between.
Countdown clock
Due to the importance and complexity of the mission, the countdown clock starts more than 2 days before the launch. But before getting into it, we need to clarify an important distinction: the L-minus and T-minus clocks.
The L-minus clock marks the effective time from that moment to the launch; for example, L-8 hours means that 8 hours are left before the launch, including the pre-planned holds.
The T-minus clock marks the mission time from that moment to the launch, so it takes into consideration the holds.
For example, the Artemis II mission will reach a point where the 2 clocks are L-40 minutes and T-10 minutes; that means there is a planned 30-minute hold, so there are 40 minutes until the launch but only 10 minutes of mission time without holds. Once the hold is complete, the 2 clocks will be synchronized, ready for terminal count.
Phase 1 - L-49h15m and counting
L-49h15m: the launch teams arrive at their stations in the mission control room.
L-48h40m: countdown clock begins.
L-48h45m to L-39h45m: LOX/LH2 (liquid oxygen/liquid hydrogen) system preparations for vehicle loading.
L-47h30m to L-43h40m: the water tank for the sound suppression system is filled with water. This system activates a few seconds before liftoff to suppress the sound of the rocket engines.
L-44h30m to L-43h: Orion is powered up, if it hasn’t already been powered up at the start of the countdown. The power-up is a crucial step, where the spacecraft comes alive: that means activating computers, flight software, sensors, navigational systems, communication systems, thermal control systems, and much more. Engineers use power coming from the ground, allowing them to check everything works correctly.
L-39h30m to L-38h45m: the core stage of SLS is powered up. It is the same principle as Orion, but with a rocket stage engineers also activate hardware/software related to pressure regulation, engine control, and propellant loading.
L-40h to L-39h: the ICPS (Interim Cryogenic Propulsion Stage) upper stage is powered up.
L-38h45m to L-34h30m: engineers and technicians perform final preparations of the four RS-25 engines at the base.
Phase 2 - L-34h30m and counting
L-33h45m to L-33h10m: the ICPS is powered down after a checkout and functionality tests.
L-32h30m to L-28h30m: Orion flight batteries are charged to 100%. These will allow the spacecraft to operate autonomously on internal power, without external help from the ground.
L-30h30m to L-23h30m: the core stage flight batteries are charged up to 100%.
L-18h45m to L-17h25m: the ICPS is powered up for launch.
L-18h to L-16h30m: the regulators of the OCSS (Orion Crew Survival System) spacesuits for the crew of Artemis II are checked for leaks. A regulator manages how much air and pressure goes into the suit.
Phase 3 - L-15 hours and counting
L-14h30m to L-13h: all non-essential personnel leave Launch Complex 39B (LC-39B).
L-13h15m to L-11h5m: Air-to-gaseous nitrogen (GN2) changeover and vehicle cavity inerting: this means that air located in the cavities of the rocket is replaced with gaseous nitrogen, an inert gas that avoids explosion and fire risk.
L-12h45m to L-11h15m: Ground Launch Sequencer (GLS) activation: the GLS is a NASA-designed software that runs the terminal countdown from T-10 minutes to T-30 seconds. However, it’s turned on well before that point to supervise and ensure that it works.
Phase 4 - L-11h40m and counting
L-11h35m to L-9h20m: timing of the 2-hour 15-minute pre-planned hold in the countdown.
L-11h40m to L-10h30m: the launch team conducts a weather and tanking briefing ahead of propellant loading.
L-10h20m: launch team polls GO or NO-GO to load the rocket with propellants.
L-10h20m to L-9h: Orion cold soak.
L-10h10m to L-9h50m: chilldown of the core stage LOX transfer line. During the chill down, cold, gaseous nitrogen is run through the line to chill it down to the propellant temperatures (which are -183°C for oxygen and -253°C for hydrogen).
L-10h10m to L-9h25m: chilldown of the core stage LH2 transfer line.
Phase 5 - L-10h and counting
L-9h50m to L-9h10m: core stage LOX main propulsion system is chilled down.
L-9h25m to L-9h: core stage LH2 slow fill start. Slow fill is a mode of loading where the propellant is slowly loaded onto the rocket.
L-9h20m: after the hold ends, the T-clock is resumed at T-8h10m.
L-9h10m to L-8h55m: core stage LOX slow fill.
L-9h to L-7h40m: core stage LH2 fast fill.
L-8h55m to L-6h10m: core stage LOX fast fill.
L-8h45m to L-8h10m: ICPS LH2 chilldown.
L-8h40m: crew is woken up for the launch.
L-8h10m to L-7h25m: ICPS LH2 fast fill start.
L-7h40m to L-7h30m: core stage LH2 topping.
L-7h30m to launch: core stage LH2 replenish.
L-7h25m to L-7h5m: ICPS LH2 vent and relief test. This test validates the venting system of the LH2 tank.
L-7h5m to L-6h55m: ICPS LH2 topping.
L-6h55m to launch: ICPS LH2 replenish.
L-6h10m to L-5h40m: core stage LOX topping.
L-6h10m to L-6h: ICPS LOX main propulsion system chilldown.
Phase 6 - L-6h and counting
L-6h to L-5h10m: ICPS LOX fast fill.
L-6h: flight crew weather brief.
L-5h40m to launch: core stage LOX replenish.
L-5h40m: stage pad rescue. This is likely an operation involving the EES (Emergency Egress System).
L-5h40m: closeout crew assembles. This is the crew designated to assist the crew members getting into their seats, check there’s no air in the cavities around the hatch, and close it.
L-5h40m: the crew begins donning (putting on) their launch and entry spacesuits, the OCSS (Orion Crew Survival System).
L-5h15m to L-5h: ICPS LOX vent and relief test.
L-5h to L-4h40m: ICPS LOX topping.
L-4h40m to launch: ICPS LOX replenish.
L-4h40m: all stages are replenishing.
L-4h40m: start of the 40-minute built-in hold.
L-4h40m to L-4h25m: closeout crew heads to the white room at the pad.
L-4h40m: the crew, having donned and checked their suits, departs the O&C (Operations and Checkout) building to head out to their vans, which will take them to LC-39B.
L-4h30m: the crew begins their journey to LC-39B.
L-4h25m to L-4h: Orion is prepared for crew ingress.
L-4h20m to L-4h10m: the crew reaches LC-39B and heads to the white room.
L-4h10m to L-4h: the crew puts on their gloves and helmets, the final items of the spacesuit.
L-4h to L-3h20m: the crew ingresses the spacecraft and gets into their respective seats, helped by the closeout crew. Once inside, the crew also performs communications and leak checks.
L-3h25m: the white room is now clear of both the flight and closeout crews.
L-3h20m to L-3h15m: closeout crew prepares the hatch for closing.
L-3h15m to L-2h20m: the closeout crew performs checks of the hatch: first, they prepare the counterbalance mechanism, which allows easier operations on the hatch by the crew. Then, they perform seal press decay checks, ensuring the integrity of the pressure in the cabin by checking there are no leaks or air in the system.
L-2h20m to L-1h40m: the closeout crew installs the hatch service panels; these service panels are a part of the closing mechanisms, and they include the LAS hatch.
L-1h40m to L-1h20m: the LAS (Launch Abort System) hatch is closed for flight.
L-1h10m: launch director brief - flight vehicle/TPS scan results with CICE: CICE is likely an acronym for a device used to check for defects, cracks, or inconsistencies on the flight vehicle structure, and especially on the TPS (Thermal Protection System). This ensures the capsule is ready for its trip to space and, most importantly, safely back on Earth.
Phase 7 - L-1 hour and counting
L-45m to L-40m: the closeout crew leaves LC-39B after completing all their duties. The Artemis II crew inside the spacecraft are now the only people left at the pad.
Phase 8 - L-40 minutes and holding
L-40m: start of the final built-in hold, lasting 30 minutes.
L-30m: final NASA Test Director (NTD) briefing.
Phase 8 - L-25 minutes and holding
L-25m: the team transitions to Orion-to-Earth communication loop following the final briefing by the NTD.
L-16m: Final poll: Launch director ensures “GO” for launch.
L-15m: following an eventual GO for launch, the crew inside Orion lowers their visors, a safety measure ahead of launch.
L-14m: short purge verification: the flight crew verifies the capsule’s environmental control systems are correctly controlling the air inside Orion.
Phase 9 - L-10 minutes and counting - Terminal count
L-10m/T-10m: with the end of the hold, the L-minus and T-minus clock sync, in a phase known as terminal count. From here on, we will use the T-minus clock, as it accurately measures the time to liftoff.
T-10m: GLS initiates terminal count.
T-8m: Crew Access Arm (CAA) retracts.
T-6m: GLS is go for core stage pressurization.
T-6m: Orion ascent pyros are armed; these pyros activate to separate the protective fairings that give the spacecraft its ogive appearance.
T-6m: Orion set to internal power. This means it is no longer receiving power from the ground, but it is drawing it from its own batteries.
T-5m57s: core stage LH2 terminates replenish.
T-5m20s: LAS is armed and available, ready to carry the crew away to safety in the case of an emergency.
T-5m20s: NTS lets Commander (Reid Wiseman) know LAS is armed and ready.
T-4m40s: GLS is go for LH2 high flow bleed check: it is the equivalent of engine chill, where cold propellant is flowed through the RS-25’s turbomachinery to thermally condition the engines for liftoff. Otherwise, the engines would suffer from sudden temperature changes at ignition.
T-4m30s: GLS is go for flight termination system arm.
T-4m: GLS is go for core stage APU (Auxiliary Power Unit) start, which is used to control the RS-25’s TVC (Thrust Vector Control), or the ability to steer the engines.
T-4m: core stage APU starts.
T-4m: core stage LOX terminates replenish.
T-3m30s: ICPS LOX terminates replenish.
T-3m10s: GLS is go for purge sequence 4, which involves purging the engines with gaseous nitrogen/helium to clean them and ensure there are no contaminants ahead of ignition.
T-2m20s: ICPS switches to internal battery power.
T-2m: booster switches to internal battery power.
T-1m30s: the core stage switches to internal power.
T-1m20s: ICPS enters terminal countdown mode.
T-50s: ICPS LH2 terminate replenish.
T-33s: GLS sends “go for automated launch sequencer” command.
T-30s: core stage flight computer switches to ALS: this is another NASA-designed software that takes care of the last 30 seconds of the countdown, conducting thousands of checks every second. Relying on hundreds of sensors, the ALS makes autonomous decisions, and it is very important for the safety of the crew.
T-12s: hydrogen burn-off igniters initiated at the base of the rocket, ensuring that volatile hydrogen is burned ahead of ignition, since it is a very flammable gas and could create explosive risks.
T-10s: GLS sends command for core stage engine start.
T-6.36s: RS-25 engine startup.
Mission profile
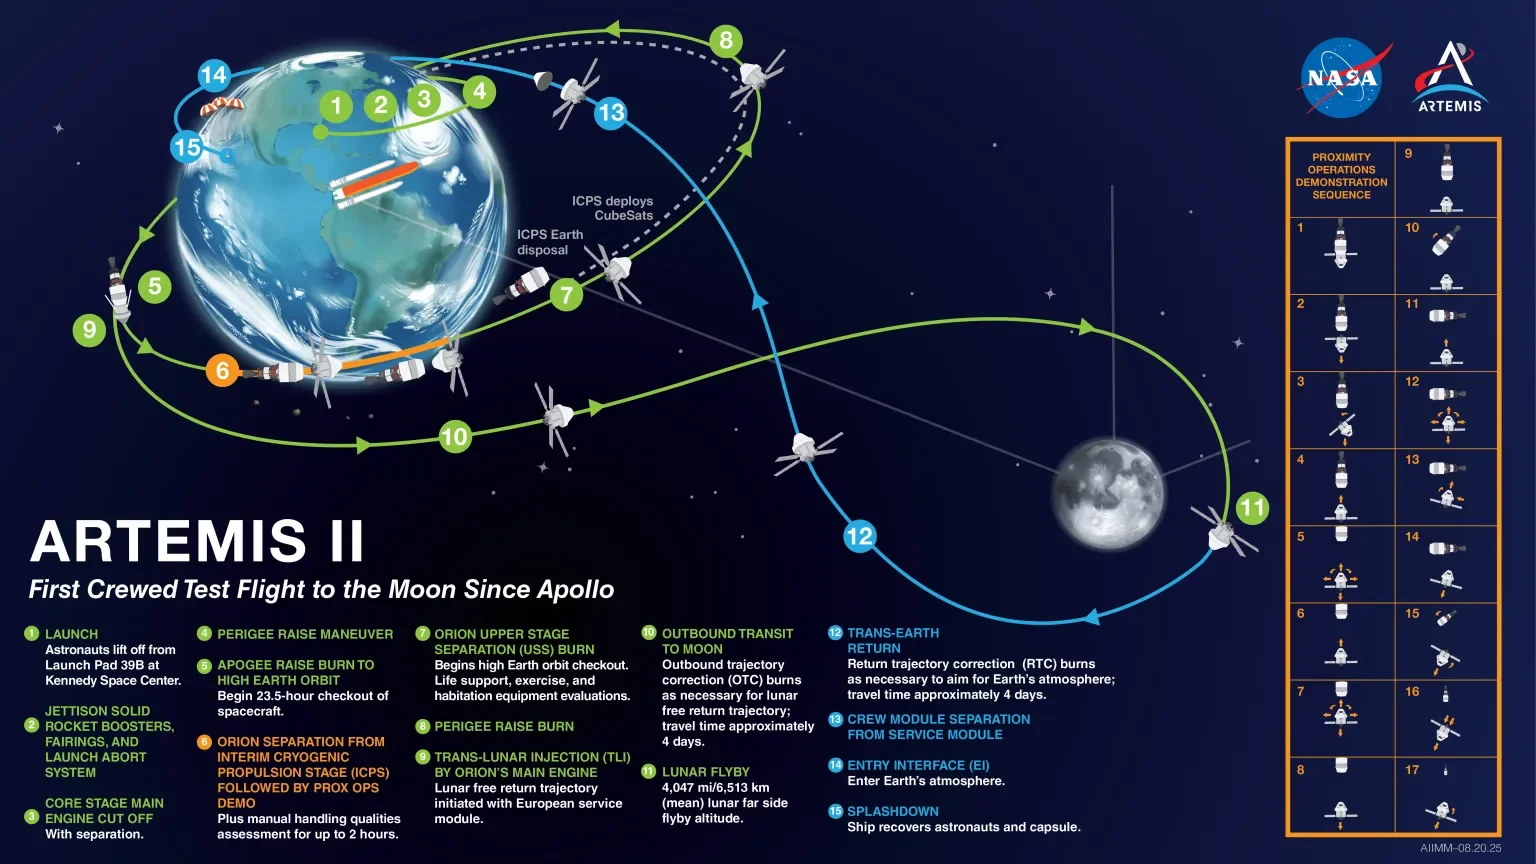
Artemis II mission profile (main) + proximity ops demo (right). Credit: NASA
The Artemis II mission will last about 10 days from launch to splashdown, which will occur in the Pacific Ocean. Let’s see a day-by-day mission plan to learn what they will do on this mission, their trajectory, and their objectives.
Day 1
Launch
T+9s: SLS clear the tower and begin pitching downrange in the roll/pitch maneuver.
T+56s: SLS reaches supersonic speeds (Mach 1).
T+1m10s: the rocket reaches Max-Q, the moment of peak stress on the rocket, caused by the mix of decreasing pressure and increasing speed. At this point, SLS is traveling at 1700 km/h at an altitude of 12 km.
T+2m8s: after completing their nominal burn, the 2 SRBs will separate from the rocket at 5112 km/h, at an altitude of almost 50 km, leaving only the 4 RS-25 running at the base of the core stage.
T+3m18s: the Launch Abort System (LAS) is jettisoned.
T+8m6s: after a long burn, the SLS core stage engines will shut off at 28.422 km/h and 155+ km of altitude.
T+8m18s: a few seconds after MECO (Main Engine Cut Off), the core stage will separate from the ICPS upper stage, in a suborbital 27 x 2222 km orbit. This ensures a reentry should any issue occur during this brief phase. 10 seconds after separation, the RL10 nozzle extension will deploy, giving the engine efficiency for its upcoming burns.
NASA provided us with some curious events on the timeline, which are the splashdown of SRBs and core stage: the 2 SRBs will pass below 120 km at T+6m10s, traveling at a speed of 16.450 km/h, while the core stage will reenter at T+2h8m23s, more than 2 hours after the launch.
Coast phase and orbital transfer
T+20m: 20 minutes after launch, Orion will extend its 4 solar panels: each array is 7 meters long, composed by 3 hinged panels held in place by cables connected to thermal resistors. When deployed, electrical currents are used to heat up the resistors, which in turn break the cables and let the arrays automatically unfold.
T+49m: having reached apogee, the RL-10 engine on the ICPS will ignite for its first operational burn, putting Orion into a safe, 185 x 2222 km orbit. Shortly before this, the crew of Orion will already be breaking a record for highest-ever Earth orbit: the current record is held by the Polaris Dawn crew, which reached a little over 1400 km in September 2024.
T+1h47m57s: after reaching perigee, the ICPS will ignite its engine once again to put Orion into a 0 by 70.376 km high Earth orbit (HEO), an unprecedented trajectory for manned missions. This orbit will take more than 23 hours to complete.
Proximity operations demonstration
After having reached this unprecedented HEO, the Artemis II crew will immediately begin an interesting and important proximity operations demonstration, a crucial milestone of the mission and one of the main objectives from a technical point of view.
At T+3h24m15s, the Orion capsule will separate from the ICPS, beginning the proximity operations demonstration. This demo will see Orion manually maneuvered towards, away from, and around the discarded upper stage to test the capsule’s handling capabilities and get crucial, real-life data on future missions requiring docking (such as Artemis III).
The demonstration will last until T+4h35m and test several maneuvers:
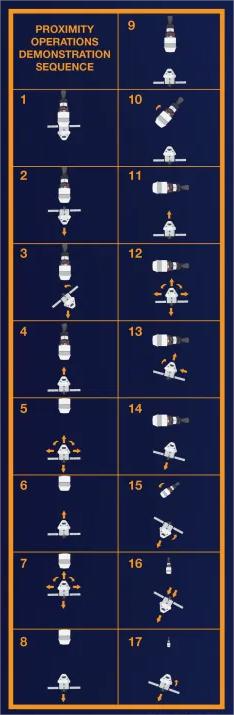
Proximity operations demonstration plan by NASA.
After separation (2), Orion will manually use its RCS (Reaction Control System) thrusters to turn around in order to directly face the forward section of the discarded ICPS (now known as target).
Once in that position, at 90 m of distance, it will test its 6DOF (6 Degrees Of Freedom, which means testing how it moves forwards, backwards, left, right, up, and down) at a safe distance from the target (5) before moving closer to it at just 9 m of distance(6); once there, it will once again test 6DOF capabilities, moving in all the directions in front of the target (7).
Orion will then translate to the side of the target (10), get closer (11), and conduct the same maneuvers from a different vantage point (12). Having demonstrated this capability, it will then point towards the engine of the target, sway around a little (13), then back away (14) before turning around and igniting its engines to increase the distance from the target (15 & 16; the engine separation burn will occur at T+4h52m); only then will it turn around again, facing the target at a safe distance (17), ahead of the latter’s disposal/deorbit burn at T+5h/T+5h2m, setting the discarded upper stage for a fiery and safe reentry over the Pacific Ocean.
Cubesat deployment
Following the ICPS disposal burn, it will deploy 4 cubesats starting at T+5h4m, at about one per minute.
These cubesats (which are shoebox-sized satellites, designed to be low-cost and low-mass with a high scientific reward) are stowed in the adapter that connects Orion to the ICPS, and they will be deployed in the HEO from the upper stage.
Launching cubesats on Artemis missions is an incredible opportunity, as they will end up in unusual orbits that aren’t easily reached by other launchers or missions; for example, the cubesats on this mission will travel between 100-200 km at perigee and 70.000+ km at apogee. It also allows for them to study space in an important environment, dominated by radiation.
Artemis I carried 10 cubesats, although most of them failed their mission shortly after deployment.
Being in a suborbital trajectory at deployment (perigee at 0 km), 3 of the 4 cubesats will have to increase their perigee to a stable altitude within 8 hours if they want to survive the first orbit. One of them, however, will conduct its mission immediately and then reenter on the first orbit. Unfortunately, we don’t have many information on the last 2 cubesats, so we will write what we know.
The 4 cubesats on this mission are:
- K-Rad: a South Korean, 12U (about 22 x 22 x 34 cm), 19.6-kg cubesat made by KASA (Korea AeroSpace Administration), it will use a dosimeter made of a material resembling human tissue, measuring space radiation and assessing biological impacts through different altitudes of the Van Allen Belts, as well as validating the performance of Samsung/SK hynix semiconductor memory chips , all crucial research for future human exploration.
It will be deployed at 36.000 km, check attitude control, and deploy its solar panels about 2 hours later; shortly after deployment, it will immediately have to use its SteamJet (water/steam) propulsion system to conduct a 12-hour burn to raise its perigee. Failure to conduct the burn will result in the cubesat reentering on the first orbit… however, if it succeeds, the nominal mission will include 28 hours of measurements, with the possibility of a 2-week extension if the satellite is healthy.
The radiation-filled environment is dangerous for these cubesats, but it will also give K-Rad an opportunity to validate radiation-hardened semiconductor chips.
This represents a key point for Korea, with the first cubesat launched aboard an Artemis mission.
- TACHELES: a German 12U cubesat developed by Berlin-based NEUROSPACE, TACHELES will test how rover electronics are affected by radiation, temperatures, and long-term exposure. NEUROSPACE is developing a small lunar rover, and this mission will provide real-life data on how the electronics behave in a space environment.
This cubesat will have to do an immediate perigee raise maneuver as well, and if successful, the mission could last up to a few years.
- ATENEA: this Argentinian cubesat will measure radiation doses across various shielding methods, measure the radiation spectrum around Earth, and it will mainly collect GPS data and test long-range, sat-to-sat communications.
- SWC-1: the Space Weather Cubesat 1 (SWC-1) was developed by Saudi Arabia, and it will analyze space weather.
At T+13h44m, Orion will conduct a perigee raise maneuver to about 160 km, making it effectively orbital and ready for the upcoming maneuvers. Orion’s propulsion system features a repurposed Space Shuttle OMS (Orbital Maneuvering System) as the main engine, providing 26.7 kN of thrust, as well as 8 auxiliary engines at the base and 24 RCS thrusters.
Orion will be put into the 23-hour HEO to conduct critical checkouts and functionality tests while still close to Earth, ensuring a safe reentry if anything goes wrong.
Day 2
On the second day of the mission, Orion will make what’s arguably the most important burn of the mission: the TLI (Trans Lunar Injection Burn).
The TLI will send Orion and its crew on a trajectory resembling the number 8, allowing a flyby of the Moon and an ensured return without any additional burns. This FRT (Free-Return Trajectory) will make use of the Earth-Moon gravitational field to pull the crew back on their splashdown site, decreasing the risk and complexity added with additional major burns. The TLI will take place at T+1d1h37m.
On the same day, at T+1d23h25m, Orion will conduct an initial OTC (Orbital Trajectory Correction) burn, ensuring it stays on the right path.
Day 3
The day will start, at T+2d0h7m, with the first of 3 major orbital trajectory correction burns, which will occur roughly at the same time on different days.
While on their way to the Moon, the crew will also conduct science and tests: on Day 3, they will conduct a CPR demonstration at T+2d2h5m, testing health capabilities and emergency procedures on Orion.
Later in the day, at T+2d5h25m, Orion will make a communication test with the Deep Space Network (DSN) antennas. These antennas will be already used from just before ICPS separation on the first day, but today’s test will validate the “Emergency Comm” radio.
Day 4
The fourth day will start with the second orbital trajectory correction maneuver, putting the spacecraft on the correct path for the Moon.
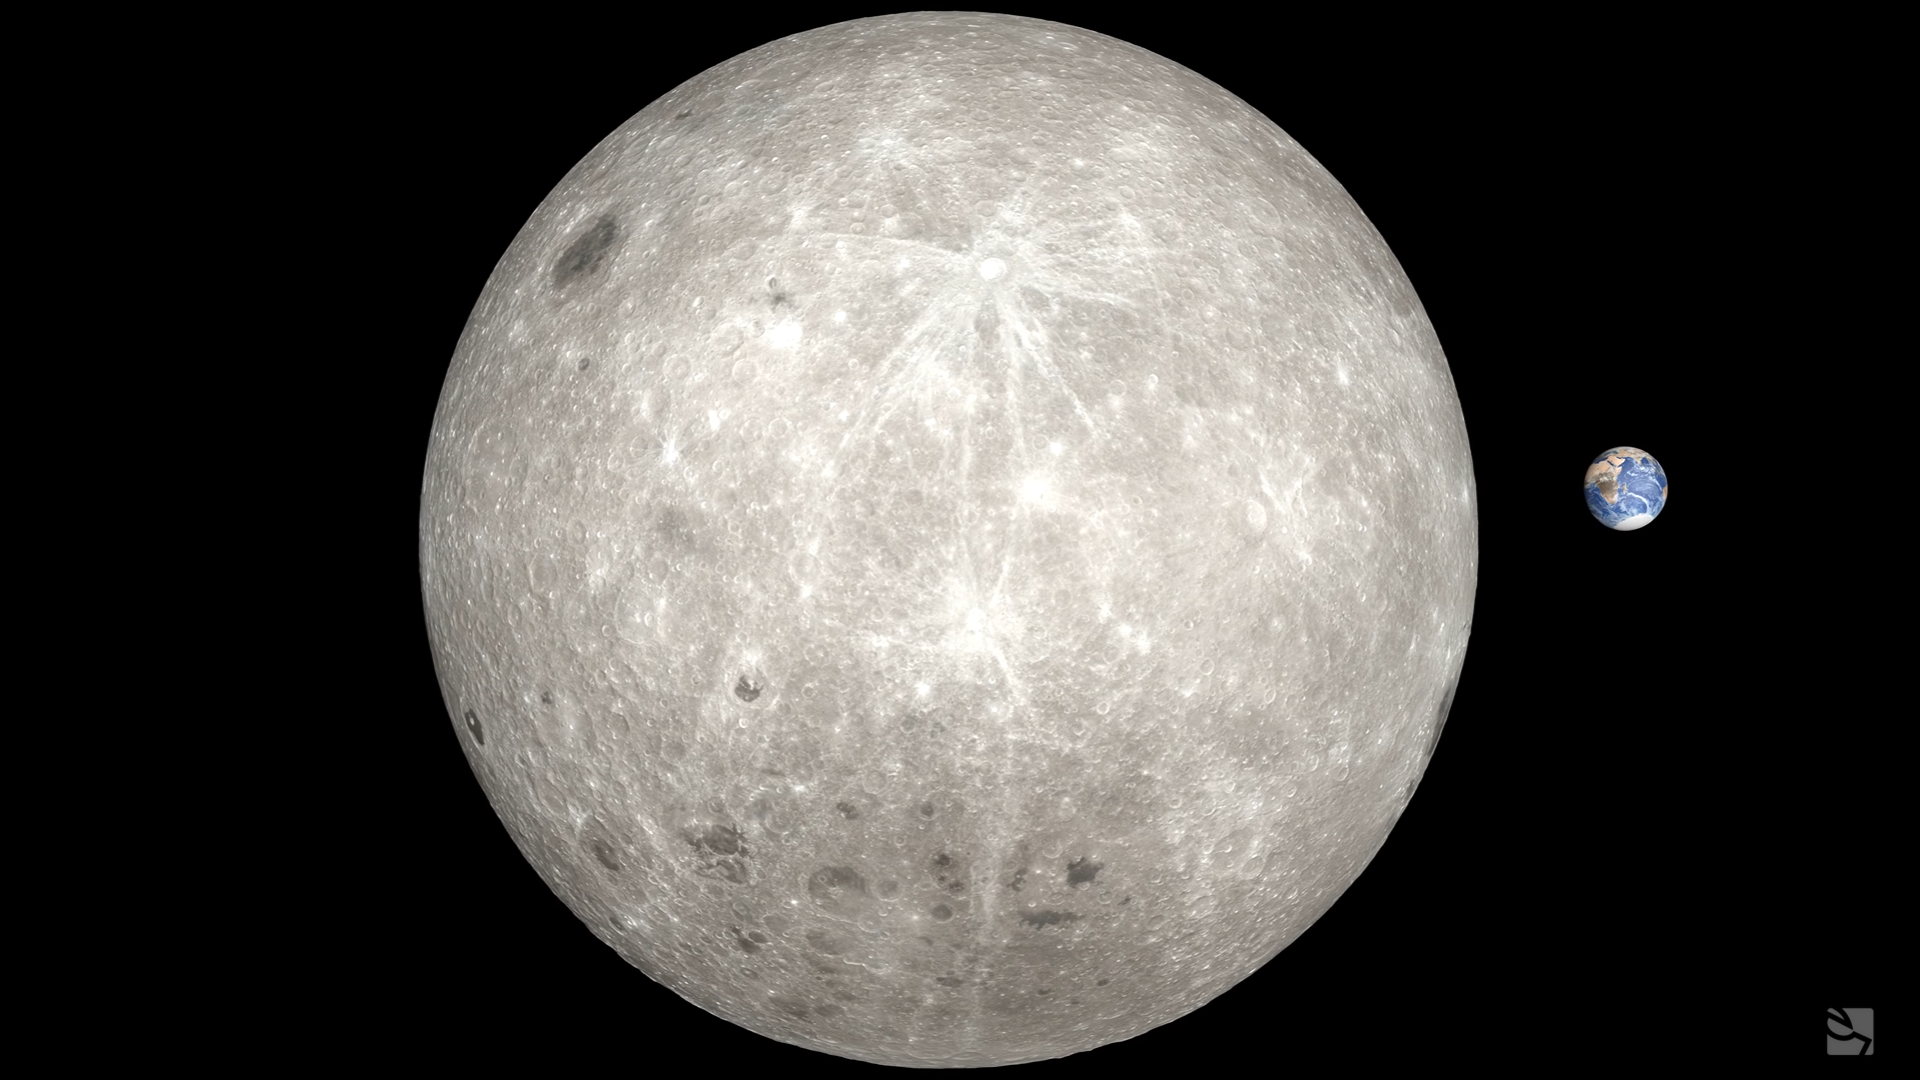
Then, in 2 shifts at T+3d3h40m and T+3d5h45m, the crew will review the lunar flyby imaging plan. During the lunar flyby, the crew won’t just enjoy the fantastic views, but they are scheduled to take a lot of pictures of the lunar surface: Artemis II will make a flyby on the far side of the Moon, which is the side that we have never seen from Earth… additionally, no human has ever seen what the Artemis II crew will see, since the Apollo missions orbited the Moon in a very low, equatorial orbit (preventing to see the poles) and orbited while the far side was dark, preventing to see any feature.
On the other side, the Artemis II crew has received extensive training to recognize and image geological features on the lunar surface.
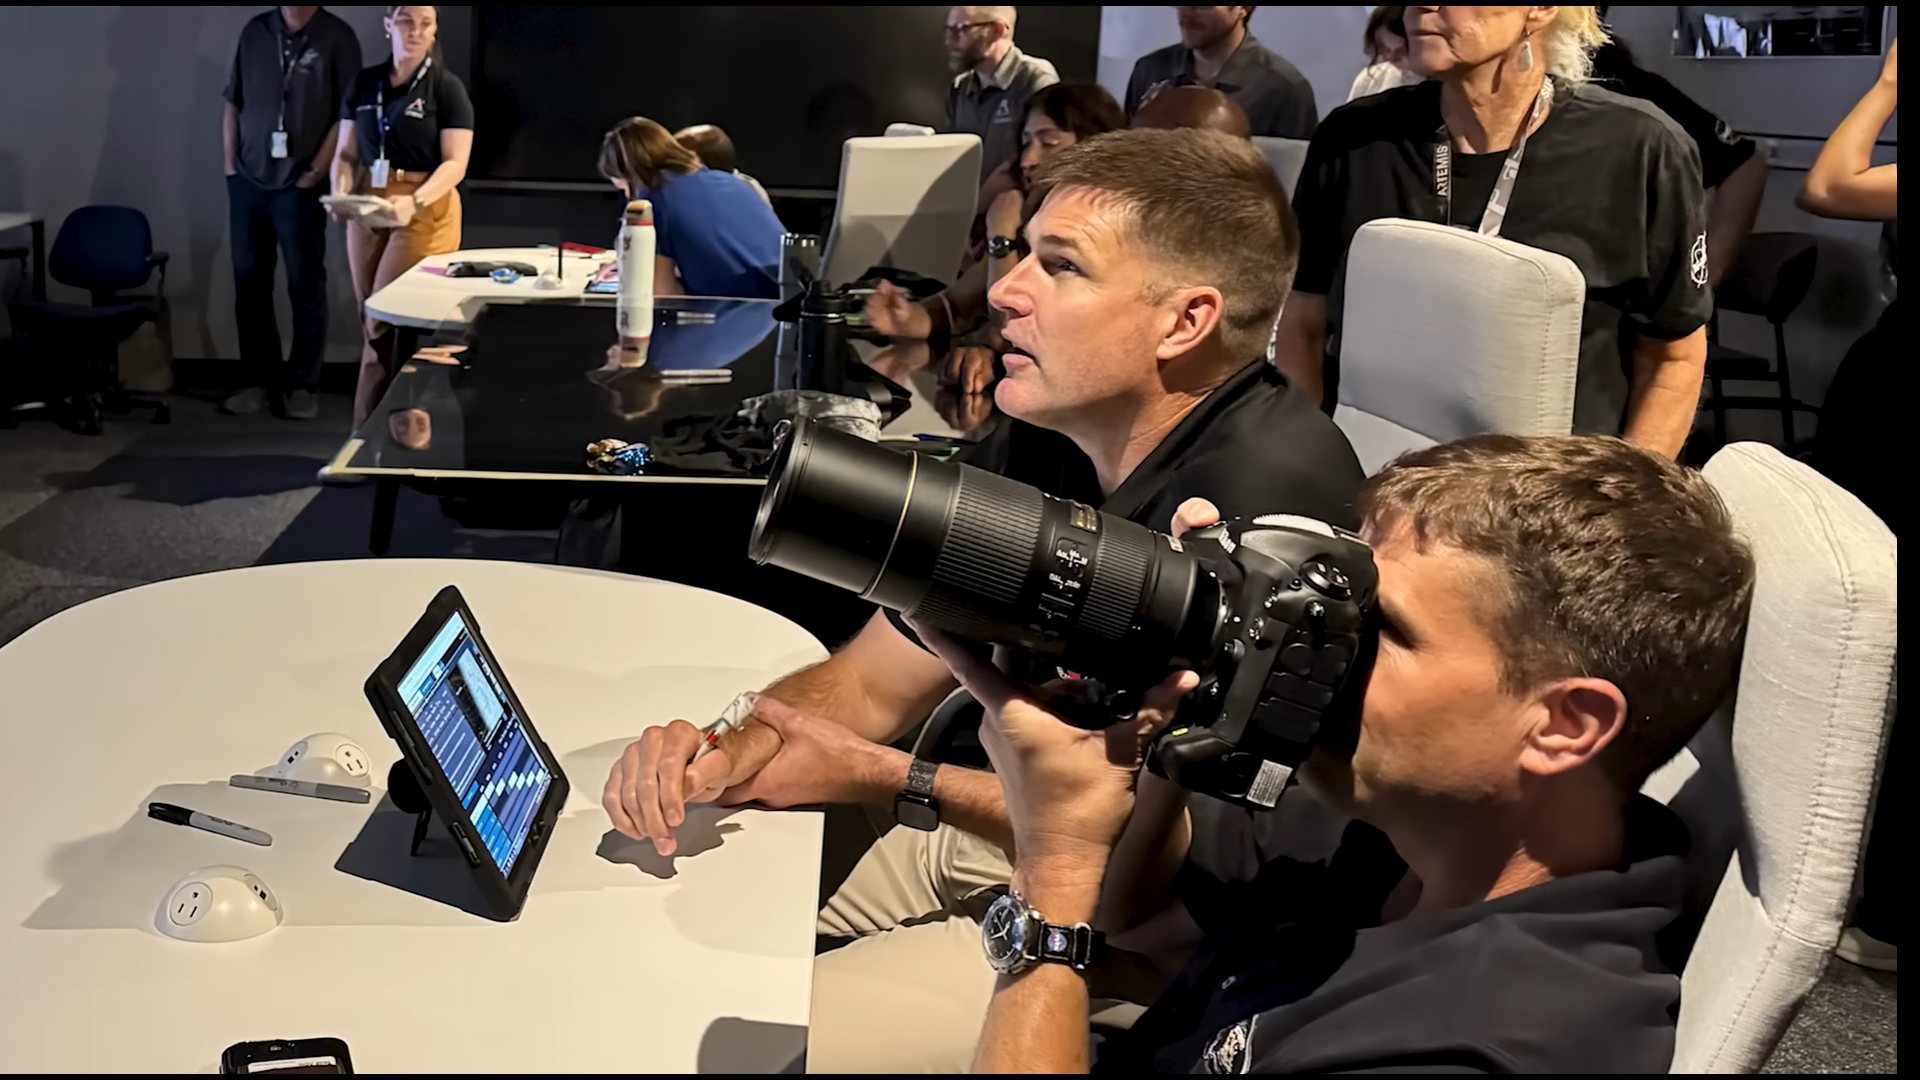
The Artemis II crew practises recognizing and taking images of geological features on a projcted image of the lunar surface. Credit: NASA
Day 5
At T+3d20h30m, the crew will practice rapidly donning and pressurizing their spacesuits. This is not only training in the case of an emergency requiring to quickly and effectively don the suits, but also a demonstration of this capability in the crammed space of Orion.
Later, at T+4d5h23m, Orion will conduct its third and last orbital trajectory correction maneuver burn, setting the spacecraft up for its upcoming flyby.
And then, at T+4d6h59m, Orion will reach the key milestone of entering the lunar sphere of influence: this “imaginary” boundary, spanning roughly 61.700 to 67.000 km from the Moon, marks the point where the lunar gravitational field becomes stronger than the terrestrial one. It means one important thing: the crew is getting closer to the Moon.
Day 6
The sixth day of the mission will be the most important one from a milestone point of view, because it will be the day where the Artemis II crew makes the lunar flyby, becoming the first humans in more than 50 years to do so. They will inspire a new generation of dreamers and explorers, paving the way for human exploration and colonization of the Moon, Mars, and beyond.
Lunar flyby and imaging plan
At T+4d21h2m, Orion’s crew will go farther than any human ever, breaking the record set by the ill-fated Apollo 13 mission of 400.171 km from Earth. At this point, they will also get closer and closer to the Moon.
A couple of hours later, at T+4d23h15m, the crew will start preparing cameras for the lunar flyby: they are taking with them 2 Nikon D5 hand-held cameras for the operation, with lenses between 80 and 400 mm of focal length.
The Nikon D5 is a 1.4-kg camera with image dimensions of 5568 x 3712 pixels, and the resolution during the flyby (according to NASA simulations) will be 112 m/pixel at its best. Other than pictures, it will also be able to produce 4K 30 fps video to be downloaded on the ground.
The camera is also low-noise and resistant to radiation, making it perfect for the lunar environment and its operational purposes.
30 minutes later, observations will begin: the crew received extensive imaging and geological training on the ground, and they learned to look for geological features, recognize them, and image them. The science team has styled an exciting and packed schedule of pictures, where the crew will take turns imaging several features, never seen previously by the human eye. One of these is the Orientale Basin, a roughly 650-950 km wide impact feature made up of concentric rings, possibly formed when a 64-km impactor body threw almost 3.5 million m3 of ejecta up to 100 km in altitude, and gravity brought them down.
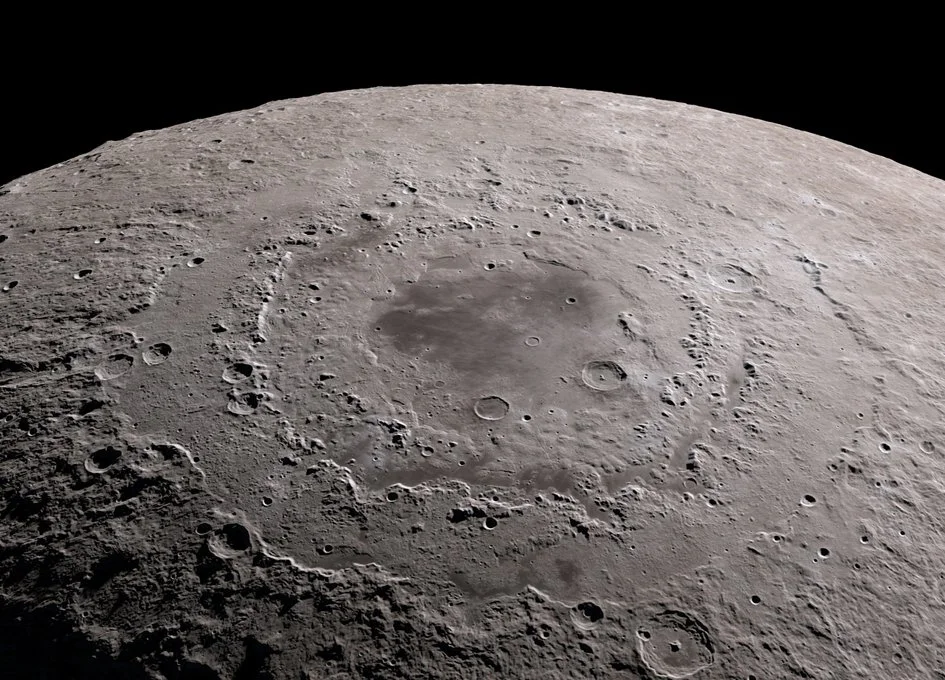
Orientale Basin as seen from lunar orbit.
Images taken by the crew will give additional and unprecedented data, helping theoretical models of the formation of such features and operational mission plans for future robotic and human exploration.
The closest point will occur at T+5d1h23m, but the distance could range between 6400 and 9600 km based on the launch day; while relatively far away, it is still closer than anyone has ever come in more than 50 years. Unfortunately, being behind the Moon, the crew will be out of contact with Earth, meaning we WON’T get a live feed of the astronauts at their closest point to the Moon. However, this blackout will only last 30-50 minutes, so we will likely see a live feed of the crew getting pretty close to the Moon, and we will definitely see the pictures and videos afterwards.
3 minutes after the closest approach to the Moon, the crew will reach their farthest point from Earth, but the distance is still unknown.
Observations will continue as the crew gets farther from the Moon, lasting until T+5d2h40m, for a total observation time of almost 3 hours!
One of the pictures we’re all looking forward to is an Earthrise picture, with the small-looking Earth in the background, and the full Moon in the foreground.
Simulation of what the crew will see near closest point. Credit: NASA
Day 7
Following the flyby, as the crew gets farther and farther from the Moon, they will enjoy a much-earned, mostly free day.
Their only main duty will be a science debrief at T+5d21h10m, where they go over the science/images gathered.
Orion will be busier, exiting the lunar sphere of influence at T+5d19h47m, and it will conduct the first of 3 return trajectory correction burns at T+6d4h23m.
Day 8
On the eight day, the crew will perform a radiation shielding demonstration at T+7d1h50m, where they will probably take waste and storage bags and make an improvised “little pillow fort,” made quickly but thick enough to shield most of the incoming radiations in the case of a solar storm. With the Sun being very active (just this month it caused a G4 geomagnetic storm), the possibility of a solar storm is real, and the crew needs to be prepared.
At T+7d4h20m, Orion’s crew will also make another piloting demonstration in manual mode, although we don’t know the details.
Day 9
On 2 occasions on this day, at T+7d23h15m and T+8d2h10m, the crew will assess their Orthostatic Intolerance Garment (OIG), which are garments they will wear on the reentry and landing day to mitigate post-spaceflight dizziness, fainting, cardiovascular stress, tachycardia, low pressure, and more. The mitigation will be possible thanks to pressure applied by these garments, from 55 mmHg on the ankles to 15 mmHg on the abdomen, which will allow blood and fluids to distribute evenly across the body, instead of pooling in the lower zones (which therefore decreases blood flow to heart and brain) due to the high-Gs at reentry and the seated position.
At T+8d4h33m, Orion will conduct the second return trajectory correction maneuver.
Day 10
Earth approach
The 10th day will be the final one for the mission, as it will include the final approach, reentry, and landing.
First up, about 5 hours before reentry (at T+8d20h33m), Orion will conduct its 3rd and final return trajectory correction maneuver, setting it up for a correct reentry path.
At T+8d22h30m, the crew will begin going through their entry checklist: this includes verifying every item is secured, donning their OIG garments, donning and pressurizing their spacesuits, and getting into the seat. After these operations are completed, at T+9d1h13m the crew and service module will separate: the European-made service module hosts the main propulsion system, solar panels, and more hardware for Orion’s sustainment in space, but at this point it isn’t needed anymore; by separating, Orion’s heatshield becomes exposed and ready for reentry, while the service module will burn up in the atmosphere.
3 minutes later, the crew module will conduct a raise burn, likely to increase the distance from the discarded service module.
Reentry
At T+9d1h33m, Orion will pass through 120 km of altitude while traveling at roughly 40.000 km/h; for reference, crews coming back from LEO (Low Earth Orbit) usually reenter at roughly 27.000 km/h.
This increased speed requires a stronger heatshield, and Orion’s is made of 186 individually attached blocks of an ablative material called Avcoat, designed to withstand the high temperatures of up to 2760 °C during peak heating. The layer of plasma, building on the heatshield, is supposed to ablate the Avcoat material in a predictable way.
Artemis I heatshield issues
However, during the Artemis I mission, Orion lost unexpected chunks of the ablative material; while it was determined that, had any crew been aboard, they would’ve been safe, this unexpected issue prompted NASA to launch a thorough investigation.
They concluded that gases formed during the ablation process on reentry penetrated inside the heatshield, and weren’t able to dissipate; this caused pressure buildup, which led to cracking of the material and some chunks of the heatshield shredded off.
The gases were a normal part of the ablation process, and they were supposed to form and then dissipate before causing any damage; on Artemis I, Orion used a skip guidance entry approach, where it would dip in the atmosphere, use aerodynamic lift to go back up, and then go back down for a landing; this unusual trajectory gave the spacecraft more range capability (meaning a longer distance between point of entry and splashdown), but since the peak temperatures were lower than expected, the ablation process was slowed down, and gases couldn’t escape.
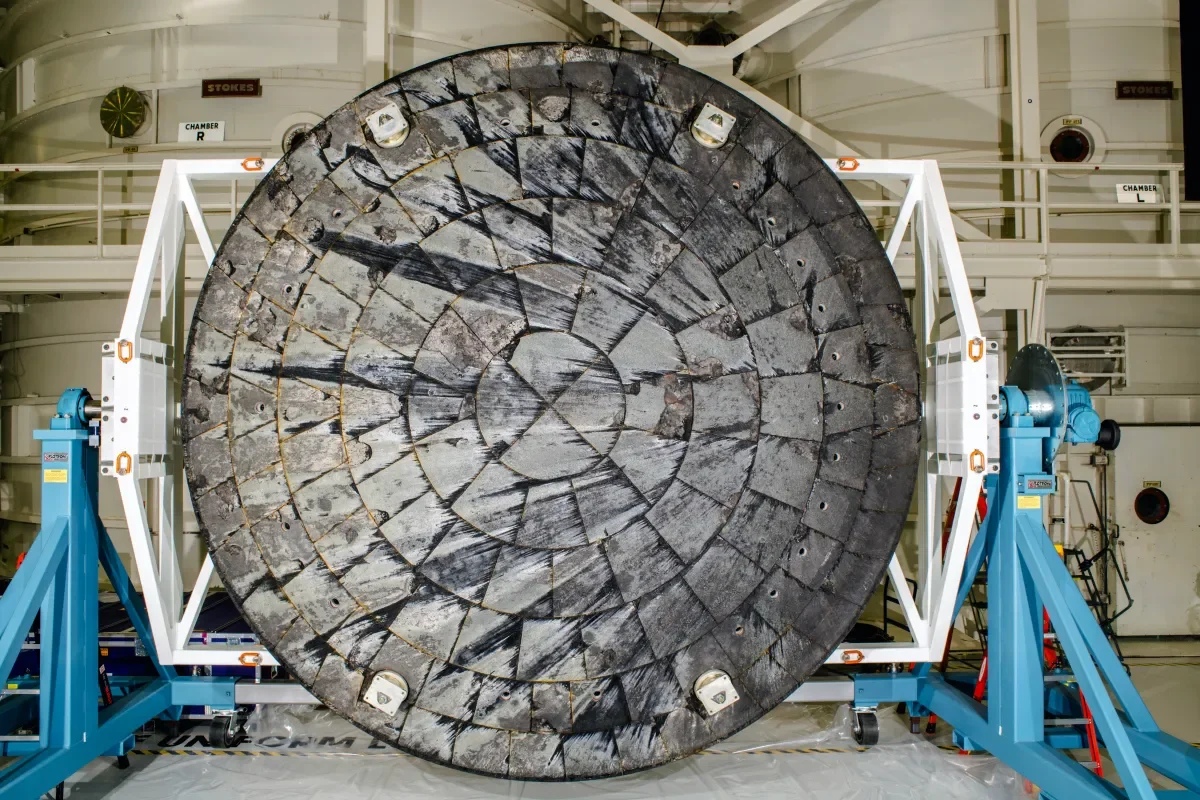
Orion’s heatshield after the Artemis I reentry.
To be faster and decrease complexity, NASA decided to make changes to Artemis II’s reentry profile, instead of making changes to the heatshield. Therefore, they will reenter at a steeper angle, allowing them to spend less time in the zone where the outgassing event occurred. While safe, it is still critical, because it will be the first time Orion reenters Earth following this trajectory, and with people onboard.
Final descent and landing
Going back to the reentry, communications will be blocked for a few minutes due to plasma surrounding the spacecraft.
Once the spacecraft has passed through this heating phase, it will deploy its forward bay covers at 11 km, exposing the parachutes ahead of deployment; at 7.5 km of altitude, 2 drogue parachutes (each 7 m in diameter) will deploy and slow the spacecraft down to 494 km/h.
As the spacecraft goes lower and lower in the atmosphere, the drogue parachutes will be released, and at less than 3 km three pilot chutes (each 3 m wide) will pull out the 3 main parachutes, each an astonishing 35 m wide; these main parachutes will slow the spacecraft down from 209 to 27 km/h, allowing for a safe splashdown in the Pacific Ocean, at T+9d1h46m.
Immediately after splashdown, 5 orange airbags will inflate at the base of the spacecraft, ensuring it is in an upright position; then, the RCS will be safed 7 minutes after splashdown, while at T+9d2h1m, Orion will finally be powered down. Only then will recovery teams approach, pulling out the crew and bringing them on the recovery ship within 2 hours of the splashdown.
What will it look like?
If you’re curious about the appearances of the Moon and the Earth from the crew’s perspective, we’ve researched it for you:
At the apogee of the initial orbit (27 x 2222 km), which will already be the farthest point from Earth reached by humans since 1972, the Earth will be roughly 95° wide, or 180 times bigger than how the Moon looks. For comparison, astronauts on the ISS see the Earth 140° wide since they’re so close to it.
On the apogee of the HEO, at 70.376 km, the Earth will look just 10° in the sky; that’s still 20 times bigger than how we see the Moon from Earth, but incredibly small compared to what astronauts have seen for the past half century.
On the 5th day, the spacecraft will enter the Moon’s sphere of influence, at roughly 67.000 km from it. At this point, the Moon will be 2°50’ wide, which is about 5.5 times larger than we see it here from Earth. Our planet will be a little more than 2° wide.
On the 6th day, as Orion goes behind the Moon, the crew will benefit from a full/near full illumination of the far side, observing things no one has ever seen before.
At the closest point, the Moon will appear 31° wide, or like a basketball held at full arm lenght. That’s an incredible size, and the videos, pictures, and sightings will never be enough to really give the perfect perspective; although, now you know what the crew will see, and maybe, you can imagine it the best you can.
Mission objectives and importance
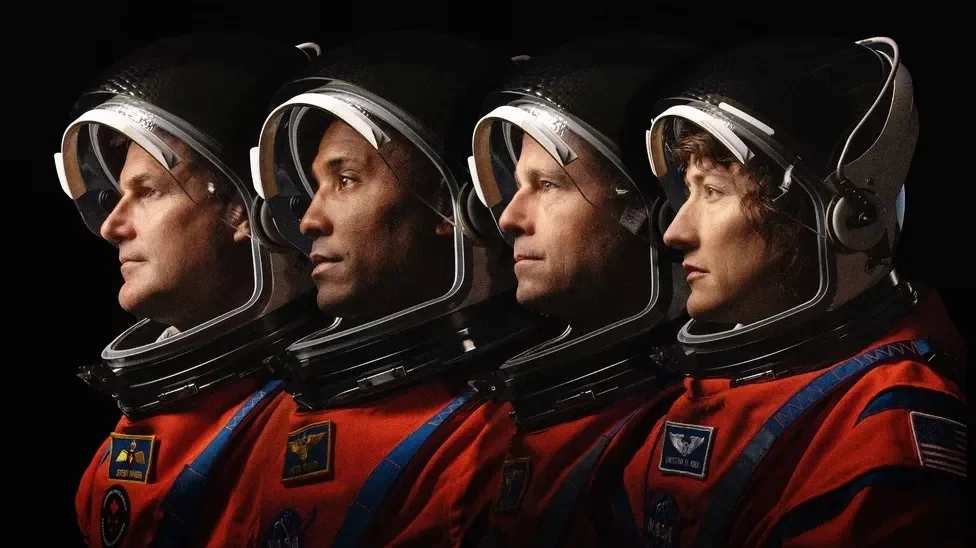
Artemis II crew. Credit: NASA
There are several main objectives for this mission: most importantly, NASA wants to validate the ground systems, the SLS rocket, and the Orion spacecraft for manned operations; this spans from pre-launch preparations to in-space operations until the return to Earth.
It is crucial for NASA to conduct this mission safely and successfully, as the data gathered on this mission will inform future spacecraft design, ensuring safety and reliability, and preparing humanity for our return to the Moon with Artemis III and beyond.
Additionally, this mission will be of utter importance and inspiration: the last time any human ventured to the Moon was in late 1972, with the Apollo 17 mission. Since then, the farthest astronauts have gone has been 1300-1400 km from Earth; now, the Artemis II crew will venture 30 times farther than anyone in the past 50 years, something that not even the past generation was able to see… this will provide unprecedented data thanks to our modern instrumentation, but it will also inspire a new generation of dreams, builders, and explorers: the high-resolution cameras that the crew will have onboard, along with their National Geographic-provided GoPros for a future documentary, and the extended live coverage by NASA are all incredible ways for people to stay engaged.
Artemis II is a critical mission of the Artemis program, being the first manned mission. It’s also a crucial stepping stone before Artemis III, currently scheduled for mid-2028, which will see humans land on the lunar South Pole! It won’t just be the first time we go to the Moon in more than 50 years, but also the first time human boots explore the polar region, crucial for a future Moon base. During Artemis III, astronauts on the lunar surface will spend 6.5 days, compared to Apollo’s short stayings of not more than 3 days.
Not to mention that more than 3 million names are flying on Orion, to the Moon and back.
So I hope you’ve enjoyed reading this article, and I hope you’re as excited for this mission as we are; stay tuned on our profile as we provide regular updates on the mission, along with daily updates once it launches!
References